Knowing How to file nails is one of those beauty basics everyone thinks they’ve mastered, until you notice breakage, uneven edges, or polish that just won’t sit right. The truth? Nail shaping is an art, and when you get it wrong, it shows. Nail tech schools even dedicate hours just to filing techniques because the way you file directly affects nail health and longevity.
I’ve seen it all, clients who saw back and forth with an emery board until their tips split, or beginners filing into “squoval” shapes that weren’t intentional. But here’s the good news: once you learn the right angles, the proper nail filing tips, and which shapes suit your hands, filing becomes less trial and error and more self-care ritual.
In this nail shaping tutorial, I’ll walk you through how to cut nails properly, how to shape your nails at home into the most popular styles (square, almond, oval, coffin, and round), and how to file nails to prevent breakage. You’ll also get my pro-level secrets, tools worth investing in (with links you can shop right away), and insider advice I picked up from nail tech school. Ready to file your nails into shape? Let’s dive in!
Filing nails is all about precision. Here’s what every beginner needs to know:
Pro product pick: Try the Tweezerman Glass Nail File for smooth filing without snagging.
A successful filing session starts with the right toolkit. Here’s the breakdown:
Insider tip from nail tech school: Keep multiple files with different grits in your kit. It’s like having different brushes for makeup, you wouldn’t contour with a fluffy eyeshadow brush, right?

Before you even think about shaping, trim your nails:
Product rec: Seki Edge Stainless Steel Nail Clippers are a favorite among pros for their sharp precision.
Once trimmed, you’ll use filing to finesse your shape. Trust me, this saves time and keeps nails stronger.
Choosing a nail shape is part style, part lifestyle. Let’s break down the most popular ones and how to file them properly.
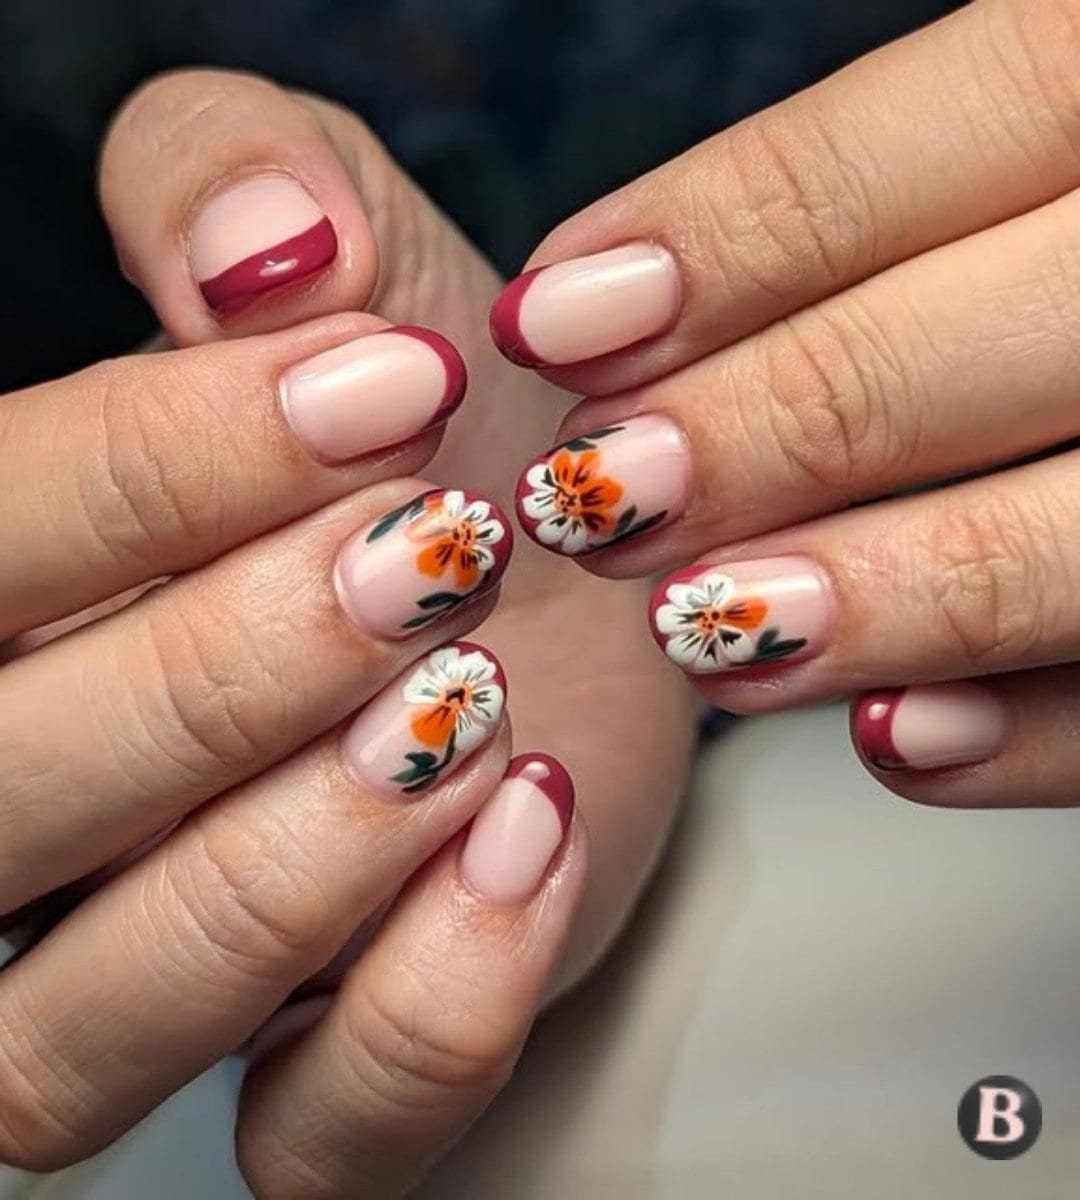
Square nails are timeless, sharp, chic, and low-maintenance. Here’s how to file nails square without breakage:
Square nails are perfect for office vibes or anyone who likes a clean, modern look. They’re also ideal for strong natural nails because the flat tip reinforces durability. If you’re looking for a tutorial, search “how to file nails square tutorials” or better yet, bookmark this guide.

Almond nails are universally flattering; they make your fingers look longer and more feminine.
Steps to file almond nails shape natural:
This is where beginners often panic about symmetry, but here’s the hack: keep checking from above to ensure both sides match. Doing my own nails, I use a mirror trick, holding both hands up together to check evenness.
Want that soft almond glow? Makartt Nail File Set has 100/180 grits for natural shaping.

Coffin nails, aka ballerina nails, are bold, modern, and Instagram-famous. Here’s how to file nails into coffin shape at home:
This look slays on longer nails or acrylics, but can weaken natural nails if you’re rough. If you’re learning how to file nails correctly, coffin style, patience is your best friend.

Oval nails = graceful and practical. Here’s the nail shaping tutorial:
Oval nails are lower-maintenance than almond or coffin, making them great if you’re always typing or cooking. They’re also beginner-friendly because they hide minor filing mistakes better.

Round nails are perfect if you like short nails but still want a polished shape. Here’s how to file short nails into a round finish:
Round nails are sturdy, less prone to breakage, and ideal for DIY beginners who say, “I’m doing my own nails but need them easy to manage.”

Doing my own nails at home taught me this: set up like a salon.
Check out my internal guide on Nail Care Tips to keep your freshly filed nails strong.

Breakage usually happens from:
To prevent this:
Filing your nails seems simple, but for many beginners, it’s where manicure mistakes happen first. Filing incorrectly can lead to weak, uneven, or split nails and undo the gorgeous look you worked so hard to create. Here’s a clear, research-backed breakdown of the most frequent nail-filing missteps and easy ways to fix them:
When nails are damp (like right after washing or a shower), they’re softer and more prone to tearing or uneven shaping. Always file completely dry nails for the best control and smooth results.
One of the biggest errors is moving the file in a back-and-forth sawing motion. This can create tiny micro-tears in the nail edge, making nails weaker and more likely to snag or split. Instead, file gently in one direction from side to center.
Beginners often grab whatever file is handy, especially very coarse ones. Coarse files can remove too much nail material and lead to brittleness. For natural nails, choose a fine-grit file (around 180–240) to shape without damage.
It’s easy to get carried away trying to perfect a shape, but over-filing thins the nail plate and weakens your nails. Aim to file only when needed (about once a week for most people) and stop as soon as you reach your desired shape.
Pressing down hard won’t speed up filing, it just stresses and damages your nail. Let the file do the work with light, controlled strokes for a smooth edge.
Reusable files and buffers can harbor bacteria and fungus if not cleaned or replaced regularly. Make sure to clean tools (or use disposable options) to avoid infections or nail irritation.
Skipping prep (removing polish, cleaning dirt, trimming long nails first) can make filing uneven or rough. Clean and prep nails before shaping to get the best finish.
After filing, use a soft buffer to smooth edges and finish with cuticle oil to nourish your nails, easy steps that make your manicure look polished and professional.
Keeping your nail shapes looking fresh, strong, and polished doesn’t just depend on the design — it’s about how you prepare, protect, and maintain them. Whether you love almond, coffin, stiletto, or rounded shapes, follow these expert-backed tips to help your manicure stay intact and beautiful for longer:
Before you paint or apply enhancements, prepare your nails properly. Gently push back cuticles, remove oils, and make sure nails are dry and smooth. Applying a high-quality base coat creates a strong foundation that helps polish or gel stick better and prevents premature chipping.
Sealing the tips of your nails, also called capping the free edge, adds extra protection against daily wear. Swipe your base coat, colour, and top coat over the edge of the nail tip. This small step makes a big difference in preventing chips and lifting.
Hydration is key! Dry nails are more likely to crack and break. Apply cuticle oil and hand cream daily to keep nails pliable and strong, which helps your shape last longer, especially with ultra-long or delicate shapes like stiletto or almond.
Water and chemicals weaken polish and nail enhancements. Wear gloves when doing household chores like washing dishes, cleaning, or gardening. Even brief exposure to water can soften polish before it fully cures.
When applying polish or gel, thin layers dry and cure more thoroughly than thick ones. Multiple thin coats help prevent smudging, dents, and lifting, especially important for long shapes that are more exposed to impacts.
A quality top coat not only adds shine but also locks in color and strengthens the surface. Reapply a thin top coat every few days to refresh the seal and protect your manicure from chips and dullness.
Even the best manicures can show wear around the base or tips over time. Lightly buffing small chips and reapplying a thin polish or top coat can extend your manicure’s life without needing a full redo.
Treat your nails like accessories, not tools. Avoid opening cans, scraping off labels, or using your nails to pry things. These everyday actions stress the nail tips and can distort your shape or cause breakage.
Some shapes inherently last longer. Rounded and almond shapes are more durable because they’re less prone to snagging compared to sharp squares or extreme points like stilettos. Choosing a shape that suits your lifestyle can make your manicure last even longer.
Pair these maintenance strategies with quality products, like long-wear gel polishes, builder gels (like BIAB), and strengthening base coats, to help your nails thrive regardless of shape or length.
You should always file in one direction from the outer corner toward the centre, rather than a back-and-forth sawing motion. That back-and-forth movement weakens layers, causes fraying, and leads to splits.
For natural nails, a finer grit file (around 180–240 grit) is best, because it’s gentler and less likely to damage the nail plate. For acrylics or heavily layered nails, coarser grits (100–150) are used to remove bulk before finishing with a smoother grit.
If your nails are shorter or you prefer keeping them manageable, you can file 2× per week. For longer nails, once per week is usually enough. Frequent, gentle filing helps maintain shape and prevents chips.
In general, it’s best to avoid heavy filing or clipping while gel polish is on, because you risk breaking the “seal” at the edges, which can cause peeling or chipping. For small rough or snagged edges, you can gently buff or smooth just the affected area.
More forgiving, low-stress shapes tend to be round or oval because they lack sharp corners that catch. If you like something with more personality, a gently softened square (“squoval”) is also a good balance of strength and elegance.
Learning how to file nails is about more than looks; it’s nail health, self-care, and style expression rolled into one. From how to file square nails for that clean office vibe to how to file almond nails shape for elegance, every nail shape tells a story. The trick is knowing your tools, filing with intention, and avoiding the common mistakes beginners make.
So, next time you’re doing your own nails at home, remember: one direction, the right angle, and a little patience. Pair your Nail shaping with smart nail care tips, and your nails will stay strong, stylish, and totally Instagram-worthy.
Grab your file, choose your shape, and make filing your new favorite form of self-care!